Every crocheter, no matter how experienced, has made the same “beginner mistakes” you might be seeing in your projects right now. None of these mean you’re bad at crochet or that you’ll never “get it”—they’re simply signs that you are learning. This guide walks you through some very common beginner mistakes, what they look like, why they happen, and simple ways to fix or prevent them.
1. Inconsistent Tension
What it looks like: Your rows or rounds look wavy, some stitches are tiny and tight while others are big and loose. A scarf might start narrow and gradually get wider or narrower for no obvious reason.
Why it happens: Your hands are still getting used to holding the yarn and hook. It’s normal to grip too tightly when you’re concentrating hard, or to loosen up as you relax. Changing your posture, mood, or even watching TV while crocheting can also change your tension.
How to fix or prevent it: Aim for “gentle but secure” tension rather than tight. Try holding your hook and yarn like you’re holding a pencil, not a hammer. Take a few minutes to warm up with a small swatch before working on your main project. If you notice your stitches suddenly getting tighter or looser, pause, take a breath, and adjust your grip. Over time, your hands will find a natural rhythm and your tension will even out.
2. Missing or Extra Stitches
What it looks like: Projects that should be straight-sided start to slant or ripple. Blankets or scarves may slowly widen or narrow because you accidentally add or lose stitches at the ends of rows.
Why it happens: It can be hard to recognize what counts as a stitch when you’re new. Turning chains, tight end stitches, or half-hidden stitches along the edge can be easy to skip. Sometimes an extra chain or a mistaken insertion point can add a stitch without you realizing it.
How to fix or prevent it: Use stitch markers to mark the first and last stitch of each row until it becomes second nature. Count your stitches at the end of every row (or every few rows for large projects). Compare your stitch count to the pattern. If you notice a mistake early, you can gently undo (or “frog”) just a row or two instead of realizing much later.
3. Not Counting Rows or Using a Row Tracker
What it looks like: One sleeve, panel, or square is longer or shorter than the other. You might end up with mismatched pieces when making garments, blankets, or amigurumi parts because you “think” you did the same number of rows but actually didn’t.
Why it happens: Counting rows in crochet is not always straightforward, especially with textured stitches. It’s easy to lose track if you pick your project up and put it down, or if you tell yourself you’ll “remember” the number you’re on without writing it down.
How to fix or prevent it: Use a simple system that works for your brain: a row counter, tally marks in a notebook, a note on your phone, or a small stitch marker moved up every few rows. Many crocheters say their biggest improvement came from simply tracking rows instead of guessing. Quick check: before you stop crocheting, write down what row you just finished.
4. Choosing the Wrong Yarn or Hook
What it looks like: Stitches are hard to see, your fabric feels stiff like cardboard or floppy like a net, or your project ends up much bigger or smaller than the pattern photo. Fuzzy yarns may snag, and very thin or very dark yarns can make it tough to tell where to put your hook.
Why it happens: Yarn labels and hook sizes can be confusing at first. It’s tempting to use whatever yarn looks prettiest or whatever hook you have on hand, even if it doesn’t match the pattern’s recommendations or your current skill level.
How to fix or prevent it: For early projects, choose a smooth, light-colored, medium-weight (often labeled “#4 worsted”) yarn and the hook size recommended on the label or in the pattern. Avoid very fluffy, novelty, or very dark yarns until you’re more comfortable. If your fabric feels too stiff, try a slightly larger hook; if it’s too loose and holey, try a smaller one. Quick check: you should be able to see and insert your hook into each stitch without struggling.
5. Misreading or Skimming Patterns
What it looks like: Your project doesn’t match the photos, a section looks “off,” or you find yourself constantly ripping back because something seems wrong but you’re not sure what. You might notice you missed a repeat or a special instruction in parentheses.
Why it happens: Crochet patterns use abbreviations, symbols, and repeats that can feel like a new language. It’s very common to skim, assume you know what’s coming next, or miss small but important details like “work in back loops only” or “repeat from * to * three times.”
How to fix or prevent it: Before you start, read through the whole pattern once, slowly. Highlight or underline repeats and special notes. Keep a list of common abbreviations nearby. As you work, use a sticky note or ruler to keep your place on the line you’re currently following. If you get stuck, go back a few lines and double-check each step rather than guessing. Remember: it’s normal to read and reread patterns when you’re learning.
6. Twisting Chains or Working Into the Wrong Part of the Chain
What it looks like: When working into a long foundation chain, the beginning of your project spirals or twists. Your starting edge may look uneven or bumpy in places, and it can be difficult to see a neat row of V-shaped stitches along the bottom.
Why it happens: Foundation chains are stretchy and floppy, and it’s easy for them to spin around on themselves. It’s also not obvious at first which part of the chain to insert your hook into, especially if you’re trying to keep your chain very tight.
How to fix or prevent it: When you make your starting chain, keep it slightly loose and lay it flat on a table or your lap before joining or working back across. Check that all the V’s of the chain are facing the same way with no twists. Choose one part of the chain (often the top loop) to consistently work into until you’re more experienced. With practice, your starting edges will look much neater.
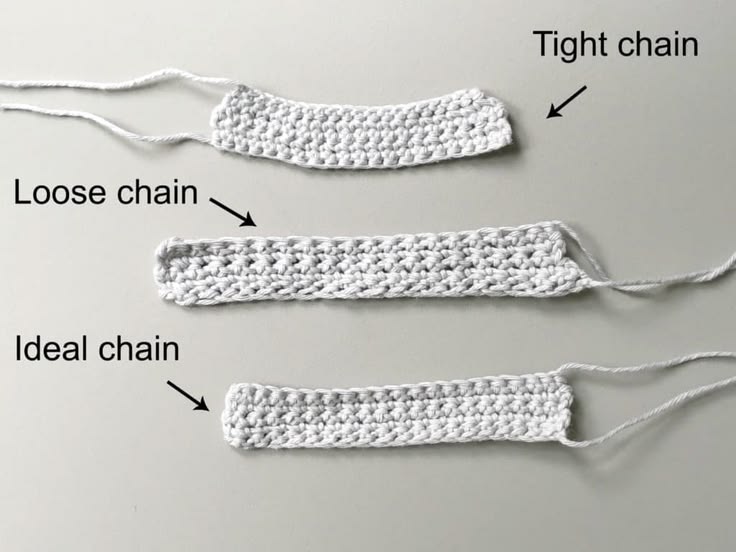
7. Turning Chains That Are Too Tight or the Wrong Height
What it looks like: The edges of your work pull in or flare out. You might see small gaps at the ends of rows or find that it’s very hard to work into the first or last stitch of a row because the turning chain is too tight or too loose.
Why it happens: Different stitches need different turning chain heights, and patterns don’t always explain the “why.” Many beginners also pull turning chains much tighter than regular stitches because they feel loose and wobbly.
How to fix or prevent it: Follow the pattern’s instructions for how many chains to work at the start of each row (for example, chain 1 for single crochet, chain 2 or 3 for double crochet). Make those chains with the same gentle tension you use for your other stitches. If your edges still look uneven, try chaining one more or one less and see if it improves. You can also place a stitch marker in the top of the turning chain to remind yourself where to work at the end of the next row if it counts as a stitch.
8. Not Checking Gauge or Skipping Swatches
What it looks like: Hats are too big or too small, sweaters don’t fit, or a blanket ends up much larger or smaller than the pattern measurements. The stitches might look fine, but the overall size is off.
Why it happens: Gauge (how many stitches and rows fit into a certain measurement) may sound like a technical detail, so it’s tempting to skip. But even small differences in tension, yarn, or hook size can add up over many rows and stitches.
How to fix or prevent it: When size matters, make a small test swatch in the stitch pattern the design uses. Measure how many stitches and rows fit into the pattern’s gauge measurement. If you get more stitches than the pattern, try a larger hook; if you get fewer stitches, try a smaller hook. It’s a little extra time at the beginning that can save you from a lot of disappointment later.
9. Splitting the Yarn
What it looks like: Your hook catches only part of the yarn, leaving fuzzy strands or loose loops sticking out of your stitches. The fabric might look messy or uneven because not every stitch was worked with the full strand of yarn.
Why it happens: Some yarns are more splitty than others, especially very soft or loosely twisted ones. It can also happen if your hook tip is very sharp, or if you insert the hook at an angle instead of cleanly through the stitch.
How to fix or prevent it: Choose a smooth, tightly twisted yarn while you’re learning. Insert your hook straight into the center of the stitch, and glance at your hook as you pull loops through to make sure you’ve caught the whole strand. If you notice a split stitch right away, it’s usually worth pulling it out and redoing it—it will make your finished piece look much neater.
10. Comparing Your Work to Others and Feeling Discouraged
What it looks like: You might feel like your stitches are “ugly” or that your projects don’t look as perfect as tutorial photos, social media posts, or items made by more experienced crocheters. This can make you want to give up or avoid trying new patterns.
Why it happens: We often only see the best, most polished versions of other people’s work online, not their first wobbly squares or practice swatches. It’s easy to forget that crochet is a skill that improves with time, and that every crocheter once struggled with the same things you are now.
How to fix or prevent it: Treat each project as practice, not a test. Keep your first pieces, even if they’re imperfect, so you can see how much you improve over time. Celebrate small wins: more even stitches, better edges, understanding a new stitch, or finishing a pattern. If you feel discouraged, take a short break, then come back and notice one thing you like about your work. Remember: “mistakes” are just part of the learning path, not proof that you’re doing it wrong.
You Are Doing Better Than You Think
If you recognize yourself in any of these mistakes, that is a good sign: it means you are practicing, learning, and paying attention. With each project, your hands will become more confident, your stitches more consistent, and patterns will start to make sense. Keep your hook moving, be kind to yourself, and remember that every expert crocheter once made the very same “beginner” mistakes you are making now.

Leave a comment